Moodlight 101: fading an RGB LED
By now we all know the the idea of the Moodlight. Philips sort of started the madness (or at least brought it to the masses) with their Livingcolors: a big RGB-LED in a transparent plastic ball. It uses coloured light to set the mood in your room to that of the person holding the remote control.
That's all really great, of course. But it's easy to make something like this by yourself, so, as many have before me, I'll make something of a how-to here. Maybe someone can use it, but at least it'll present thousands with the opportunity to bitch about my silly coding.
The first step (after getting Hello World to work) is connecting an RGB LED, and making a few nice colors using PWM. The idea has been explained about a million times by now, so if you'd like to learn more about it you can read the article at Wikipedia.
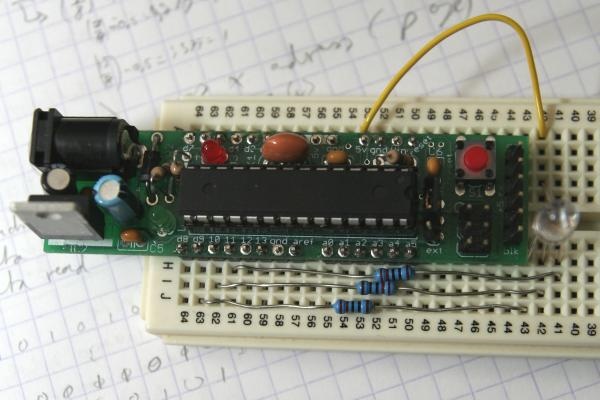
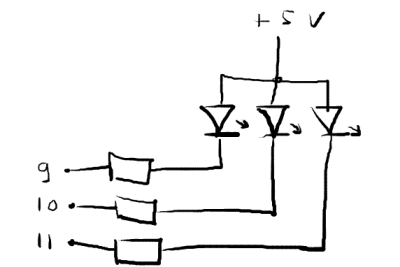
Take a random RGB-LED you've got lying around somewhere, and 3 more or less fitting resistors. To make proper colours you'll need to calculate the values you need, based on the specs of the LED, but I didn't know those, and I didn't have any other resistors than these ones (220 ohms, a pretty safe value to make any LED light up at 5V).
This LED has a common anode (+), so in order to make it work you'll need to put a "0" on the pin corresponding to the colour you'd like to see. Because of this, PWMming will be inversed.
As far as code goes, it's pretty simple:
/*
* RGB fading
* One RGB-led (common anode) connected to pins 9, 10 and 11.
* (c) (for what it's worth) 2008, Niels Hordijk
*/
// Define the pins the LED is connected to; be sure to use 3 (of the 6 available) PWM-pins.
int pinR = 9;
int pinG = 11;
int pinB = 10;
int i;
void setup() {
//set pins to output
pinMode(pinR, OUTPUT);
pinMode(pinG, OUTPUT);
pinMode(pinB, OUTPUT);
//turn off the lights
analogWrite(pinR, 255);
analogWrite(pinG, 255);
analogWrite(pinB, 255);
}
void loop() { //main program
for (i=255; i>=0; i--) {
//fade in - red LED
analogWrite(pinR, i);
delay(15);
}
analogWrite(pinR, 255); //and turn it off again
for (i=255; i>=0; i--) {
//fade in - green LED
analogWrite(pinG, i);
delay(15);
}
analogWrite(pinG, 255);
for (i=255; i>=0; i--) {
//fade in - blue LED
analogWrite(pinB, i);
delay(15);
}
analogWrite(pinB, 255);
}
And to post something semi-original: fade from random colour to random colour:
/*
* RGB random fading
* One RGB-led (common anode) connected to pins 9, 10 and 11.
* (c) (for what it's worth) 2008, Niels Hordijk
*/
// Define the pins the LED is connected to; be sure to use 3 (of the 6 available) PWM-pins.
int pinR = 9;
int pinG = 11;
int pinB = 10;
int red = 255;
int green = 255;
int blue = 255;
int redNew;
int greenNew;
int blueNew;
int fadeSteps = 100; //sets fade-resolution
int fadeDelay = 15; //sets fade-delay
int i;
void setup() {
//set pins to output
pinMode(pinR, OUTPUT);
pinMode(pinG, OUTPUT);
pinMode(pinB, OUTPUT);
//turn off the lights
analogWrite(pinR, red);
analogWrite(pinG, green);
analogWrite(pinB, blue);
//randomize the (pseudo) random number generator (check the reference)
randomSeed(analogRead(0));
}
void loop() { //main program
//set random values
redNew = random(256);
greenNew = random(256);
blueNew = random(256);
for (i=1; i<fadeSteps; i++) {
analogWrite(pinR, red+(redNew-red)*i/fadeSteps);
analogWrite(pinG, green+(greenNew-green)*i/fadeSteps);
analogWrite(pinB, blue+(blueNew-blue)*i/fadeSteps);
delay(fadeDelay);
}
red = redNew;
green = greenNew;
blue = blueNew;
}
And a bit of movie to make it slightly less boring:
That's all really great, of course. But it's easy to make something like this by yourself, so, as many have before me, I'll make something of a how-to here. Maybe someone can use it, but at least it'll present thousands with the opportunity to bitch about my silly coding.
The first step (after getting Hello World to work) is connecting an RGB LED, and making a few nice colors using PWM. The idea has been explained about a million times by now, so if you'd like to learn more about it you can read the article at Wikipedia.
Take a random RGB-LED you've got lying around somewhere, and 3 more or less fitting resistors. To make proper colours you'll need to calculate the values you need, based on the specs of the LED, but I didn't know those, and I didn't have any other resistors than these ones (220 ohms, a pretty safe value to make any LED light up at 5V).
This LED has a common anode (+), so in order to make it work you'll need to put a "0" on the pin corresponding to the colour you'd like to see. Because of this, PWMming will be inversed.
As far as code goes, it's pretty simple:
/*
* RGB fading
* One RGB-led (common anode) connected to pins 9, 10 and 11.
* (c) (for what it's worth) 2008, Niels Hordijk
*/
// Define the pins the LED is connected to; be sure to use 3 (of the 6 available) PWM-pins.
int pinR = 9;
int pinG = 11;
int pinB = 10;
int i;
void setup() {
//set pins to output
pinMode(pinR, OUTPUT);
pinMode(pinG, OUTPUT);
pinMode(pinB, OUTPUT);
//turn off the lights
analogWrite(pinR, 255);
analogWrite(pinG, 255);
analogWrite(pinB, 255);
}
void loop() { //main program
for (i=255; i>=0; i--) {
//fade in - red LED
analogWrite(pinR, i);
delay(15);
}
analogWrite(pinR, 255); //and turn it off again
for (i=255; i>=0; i--) {
//fade in - green LED
analogWrite(pinG, i);
delay(15);
}
analogWrite(pinG, 255);
for (i=255; i>=0; i--) {
//fade in - blue LED
analogWrite(pinB, i);
delay(15);
}
analogWrite(pinB, 255);
}
And to post something semi-original: fade from random colour to random colour:
/*
* RGB random fading
* One RGB-led (common anode) connected to pins 9, 10 and 11.
* (c) (for what it's worth) 2008, Niels Hordijk
*/
// Define the pins the LED is connected to; be sure to use 3 (of the 6 available) PWM-pins.
int pinR = 9;
int pinG = 11;
int pinB = 10;
int red = 255;
int green = 255;
int blue = 255;
int redNew;
int greenNew;
int blueNew;
int fadeSteps = 100; //sets fade-resolution
int fadeDelay = 15; //sets fade-delay
int i;
void setup() {
//set pins to output
pinMode(pinR, OUTPUT);
pinMode(pinG, OUTPUT);
pinMode(pinB, OUTPUT);
//turn off the lights
analogWrite(pinR, red);
analogWrite(pinG, green);
analogWrite(pinB, blue);
//randomize the (pseudo) random number generator (check the reference)
randomSeed(analogRead(0));
}
void loop() { //main program
//set random values
redNew = random(256);
greenNew = random(256);
blueNew = random(256);
for (i=1; i<fadeSteps; i++) {
analogWrite(pinR, red+(redNew-red)*i/fadeSteps);
analogWrite(pinG, green+(greenNew-green)*i/fadeSteps);
analogWrite(pinB, blue+(blueNew-blue)*i/fadeSteps);
delay(fadeDelay);
}
red = redNew;
green = greenNew;
blue = blueNew;
}
And a bit of movie to make it slightly less boring:
posted by Tarin at 5:34 PM
0 comments
![]()